Mock API servers for Maestro Android testing using MockServer and Gradle
Maestro is a great library for writing high-level UI tests that verify your Android app works from your users' perspective. For a more detailed intro into Maestro, please see my recent Maestro intro post.
If you're testing an app that makes REST API calls, you'll need a way to verify those parts of the app work correctly. While full tests that access real versions of the APIs can be valuable, there are tradeoffs to using real APIs in Maestro tests:
- data returned by real APIs may not be consistent, making test verifications inconsistent
- real APIs may not be up and available, leading to periodic failures
Each of these challenges can lead to flaky tests. And flaky tests can be worse than no tests.
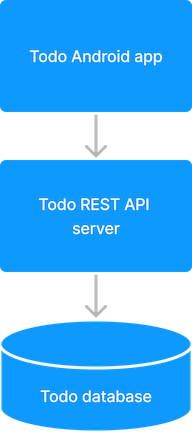
For the most repeatable tests you can use a fake or mock version of the REST API endpoints. In this post, we'll walk through an example of a todo Android app that calls out to a todo REST API server.
Creating mock server
To start, we'll dive into the Retrofit client that the mobile app uses to call the todo server. The todo server stores the data in this example - it has endpoints for:
- creating a todo
- listing all todos
- toggling whether a todo is complete
Then we'll cover the mock version of the todo server that we'll use during our Maestro tests.
Client Gradle subproject
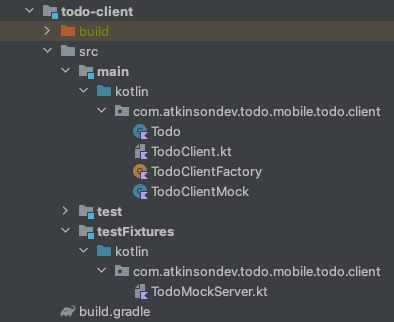
To keep the modules smaller and more focused in my Gradle projects, I like to put external clients into their own subproject. This helps isolate that code in one place so it's easy to find and change. And with the Gradle build cache, the client will only need to be built and its tests run when it changes. Otherwise Gradle will just pull it from the cache, saving time in my build.
Having a separate subproject will help here as well - as we can isolate the mock server into the test fixtures of the client subproject. That way we can re-use it across the client and the app, and it won't leak into the packaged app code.
First, the Retrofit client interface that our app will use to call the REST API server:
 1import retrofit2.Response
 2import retrofit2.http.*
 3
 4interface TodoClient {
 5    @GET("/todos")
 6    suspend fun listTodos(): Response<List<Todo>>
 7
 8    @POST("/todos")
 9    suspend fun createTodo(@Body createTodoRequest: CreateTodoRequest): Response<Unit>
10
11    @PUT("/todos/{id}")
12    suspend fun updateTodo(@Path("id") id: Long, @Body updateTodoRequest: UpdateTodoRequest): Response<Todo>
13}
14
15data class CreateTodoRequest(val title: String)
16
17data class UpdateTodoRequest(val completed: Boolean)
For unit tests and rendering previews in the mobile app, we can create a mock version of the interface that keeps data in memory:
 1import okhttp3.ResponseBody.Companion.toResponseBody
 2import retrofit2.Response
 3
 4class TodoClientMock : TodoClient {
 5    val todos: MutableList<Todo> = mutableListOf()
 6
 7    override suspend fun listTodos(): Response<List<Todo>> {
 8        return Response.success(todos)
 9    }
10
11    override suspend fun createTodo(createTodoRequest: CreateTodoRequest): Response<Unit> {
12        val newTodo = Todo(
13            id = randomTestId(),
14            title = createTodoRequest.title,
15            completed = false,
16        )
17
18        todos.add(newTodo)
19
20        return Response.success(null)
21    }
22
23    override suspend fun updateTodo(
24        id: Long,
25        updateTodoRequest: UpdateTodoRequest
26    ): Response<Todo> {
27        val todoToUpdate = todos.find { it.id == id }
28        val todoIndex = todos.indexOfFirst { it.id == id }
29
30        return if (todoToUpdate != null) {
31            val updatedTodo = todoToUpdate.copy(completed = updateTodoRequest.completed)
32
33            todos[todoIndex] = updatedTodo
34
35            Response.success(updatedTodo)
36        } else {
37            Response.error(404, "".toResponseBody())
38        }
39    }
40
41    companion object {
42        fun randomTestId(): Long = Math.random().times(10000).toLong()
43    }
44}
This class has the logic to replicate our todo server, but it's not a full REST API yet. To expose this as a REST API, we'll use the MockServer library.
Mock server implementation
We can use the above mock version of the client interface with the MockServer library to serve up real API endpoints that our mobile app can access.
 1import com.google.gson.Gson
 2import kotlinx.coroutines.runBlocking
 3import org.mockserver.integration.ClientAndServer.startClientAndServer
 4import org.mockserver.model.HttpRequest
 5import org.mockserver.model.HttpResponse.*
 6import org.mockserver.model.MediaType
 7
 8fun main() {
 9    val mockServer = startClientAndServer(8090)
10
11    val todoClientMock = TodoClientMock()
12
13    todoClientMock.todos.add(
14        Todo(
15            id = 1,
16            title = "Todo 1",
17            completed = false
18        )
19    )
20    todoClientMock.todos.add(
21        Todo(
22            id = 2,
23            title = "Todo 2",
24            completed = true
25        )
26    )
27
28    mockServer.`when`(
29        HttpRequest.request()
30            .withMethod("GET")
31            .withPath("/todos")
32    ).respond {
33        response()
34            .withStatusCode(200)
35            .withBody(Gson().toJson(todoClientMock.todos), MediaType.APPLICATION_JSON)
36    }
37
38    mockServer.`when`(
39        HttpRequest.request()
40            .withMethod("POST")
41            .withPath("/todos")
42    ).respond { request ->
43        val incomingTodo = Gson().fromJson(request.bodyAsString, CreateTodoRequest::class.java)
44
45        runBlocking { todoClientMock.createTodo(incomingTodo) }
46
47        response()
48            .withStatusCode(200)
49    }
50}
The above will start up the mock REST server on port 8090 and seed it with two fake todos.
And it has the logic to handle adding additional todos and marking them as complete.
Then we can point our mobile app todo client to http://10.0.2.2:8090 when running in a local Android emulator.
Then the app will talk to this local mock server.
Running mock server alongside tests
Now that we have our mock server coded up, we need to run it alongside our tests. Starting the server before the tests run and shutting it down after they complete.
Using the Maestro Gradle plugin I built, you can run your Maestro tests as part of your Gradle build:
1task maestroTest(type: com.atkinsondev.maestro.MaestroTest) {
2    dependsOn 'installDebugAndroidTest'
3
4    flowsDir = file("src/maestro/flows")
5}
Now that you can run your Maestro tests as part of your Gradle build, you can use another Gradle task to start and stop the mock API server.
Start mock server for Maestro tests
You can use the Gradle exec-fork plugin to start the mock server before your Maestro tests begin and then shut down the server afterwards.
To use the exec-fork plugin, first add it to the plugins block in your Gradle build file:
1plugins {
2    id 'com.github.psxpaul.execfork' version '0.2.1'
3}
1task startMockServerFork(type: com.github.psxpaul.task.JavaExecFork) {
2    dependsOn 'build'
3    classpath = sourceSets.main.runtimeClasspath + sourceSets.testFixtures.runtimeClasspath
4    main = 'com.atkinsondev.todo.mobile.todo.client.TodoMockServerKt'
5    stopAfter = tasks.getByPath(':app:maestroTest')
6    waitForPort = 8090
7    timeout = 60
8}
This task configuration will run the main class for your mock server TodoMockServerKt
and then wait for the server to be available on port 8090.
Once the server is ready, then you can start your Maestro tests.
Now let's update your maestroTest task to depend on the startMockServerFork task so Gradle will start the mock server
for us before the tests run:
1task maestroTest(type: com.atkinsondev.maestro.MaestroTest) {
2    dependsOn 'installDebugAndroidTest', ':todo-client:startMockServerFork'
3
4    flowsDir = file("src/maestro/flows")
5}
Now you can run ./gradlew maestroTest and Gradle will:
- Start the mock server and wait for it to be up and running
- Run your Maestro tests
- Shut down the mock server
Mock server for running app locally
You can also use the mock server for developing locally on the mobile app. That way you can run your app even if the real API isn't available or if you want full control over what data it returns.
To manually start the mock server locally, you can create a JavaExec Gradle task that will use the same main
function that you're using for your tests:
1task startMockServer(type: JavaExec) {
2    classpath = sourceSets.main.runtimeClasspath + sourceSets.testFixtures.runtimeClasspath
3
4    mainClass = 'com.atkinsondev.todo.mobile.todo.client.TodoMockServerKt'
5}
Then you can run ./gradlew startMockServer to run the mock server for your local app to use!
Conclusion
The MockServer library can be a great way to run a mock REST API server alongside your Maestro tests for stable and repeatable testing for apps that use REST APIs. And you can use Gradle to orchestrate running the mock server alongside your Maestro tests. Also, you can also use the same mock server for convenient local app development as well.
Happy testing!