High-level Android UI tests with Maestro
For fun I've recently been building an Android app with Kotlin and Compose. With this app, I can set goals for the week and track my progress towards those goals. My schedule is too varied day-to-day to successfully finish daily goals of say, read X minutes a day. But I found that setting goals per week helped me achieve those goals more easily than trying to find time each and every day to make progress on these goals. Plus it can be demoralizing to miss a daily goal for a couple days in a row, making it easy to give up. Whereas with weekly goals I can make up time the next day without feeling like I failed.
As an example, say I have goals to exercise for 4 hours each week, read for at least 2 hours, and write for 2 hours:
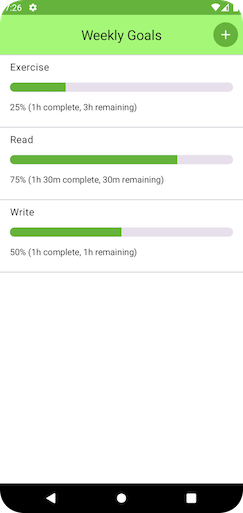
I can then start progress towards one of these goals throughout the week to track my progress. And when I inevitably forget to start the timer until I'm halfway through my morning workout, I can go back and edit the start time.
When building this app, I started with a few different types of tests that let me check different parts functionality:
- unit tests for key logic
- connected tests for each screen and key components
- connected tests for the Room persistence layer
While these tests are valuable, they're verifying different components of the application work in isolation. I didn't have the type of high-level integration/functional test that I'd have in webapp development with a browser testing tool like Cypress. High-level tests are great to have as a safety net to ensure my components worked together, in addition to the isolated, focused tests I'd written.
Enter Maestro.
Maestro intro
Maestro lets you write high-level tests (or "flows" in Maestro terminology) that interact with your app the same way as your users. Tapping on the screen, entering text using the keyboard, etc. That way you can verify the different components of your application do work together to deliver the user experience you're expecting.
Installing Maestro
To get started with Maestro, first install the Maestro CLI. On MacOS, you can install the Maestro CLI with Homebrew:
1brew tap mobile-dev-inc/tap
2brew install maestro
Or if you are using Linux or Windows, check out the installation instructions in the Maestro docs.
Writing Maestro tests
Maestro tests are very concise. No excessive setup or wrapping steps in waits/timeouts to deal with async operations. You just YAML steps that interact with your app the way a user would - tap on the screen, enter text using the keyboard, etc.
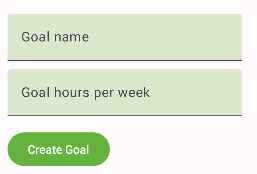
For example, here is a simple test that launches the app and fills out a form to add a new weekly goal in the app:
 1appId: com.atkinsondev.weeklygoals
 2---
 3- launchApp
 4
 5- tapOn: "Add Goal"
 6
 7- tapOn: "Goal name"
 8- inputText: "Exercise"
 9
10- tapOn: "Goal hours per week"
11- inputText: "3"
12
13- tapOn: "Create Goal"
The appId on the first line of the flow file is the applicationId specified in your app's build.gradle file.
For instance, the applicationId from my weekly goals app:
build.gradle
1android {
2    defaultConfig {
3        applicationId "com.atkinsondev.weeklygoals"
4    }
5}
A test that drives the UI is good start, but to ensure your app is behaving correctly you'll also need assertions.
For verifying expected behavior in your tests, you can use assertVisible to verify that elements are visible on the screen.
Such as updating the above test to now verify the new goal you created is displayed on the screen that lists all goals:
 1appId: com.atkinsondev.weeklygoals
 2---
 3- clearState
 4- launchApp
 5
 6- tapOn: "Add Goal"
 7
 8# Now on the add-goal screen
 9
10- tapOn: "Goal name"
11- inputText: "Exercise"
12
13- tapOn: "Goal hours per week"
14- inputText: "3"
15
16- tapOn: "Create Goal"
17
18# Back on the goal-list screen
19
20- assertVisible: "Exercise"
21- assertVisible: "0% (0m complete, 3h remaining)"
Maestro comes with a variety of commands you can include in your tests. Docs on the full set of Maestro commands and their options are available on the Maestro docs site.
Interacting with text fields
As you saw above, to enter a value in the text field:
- Tap on the text field
- Enter the desired value using the keyboard
For example, to type in "Exercise" to the goal name text input:
1- tapOn: "Goal name"
2- inputText: "Exercise"
Tapping on elements by regex
If the full text of the element is dynamic and you won't know the full value when writing the test, you can also select the element via a regex of the text.
For example, my weekly goals app displays the start time when the user is starting a new progress entry on their goal. The user can click that element and then edit its start time. But the start time depends on when the test runs and clicks on the start-progress button, so the test script won't know the exact start time.
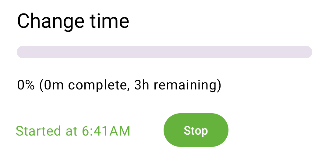
To reliably click on the started-at element in the test, you can use a regex to find it by the beginning text:
1- tapOn: "Started at .*"
Complex built-in components
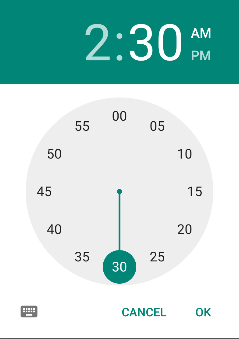
With Maestro it's straightforward to test built-in components that can be tricky to verify in more isolated tests. For example, the goals app lets the user edit times using Android's time picker.
To choose a new time with the time picker, you can interact with it the same way you would components you built. The below test snipped will set the time to 2:30 AM on the time picker:
1- tapOn: "2"
2- tapOn: "30"
3- tapOn: "AM"
4- tapOn: "OK"
Clearing state between tests
Maestro also has a command to clear all the state in the app (including the local database) so each test can start with a clean slate and be more repeatable. If each test started with an unknown amount of existing data in the local database, your tests have a higher chance of being flaky.
To reset the app to a blank slate between tests, add the clearState command as the first step in the flow file:
 1appId: com.atkinsondev.weeklygoals
 2---
 3- clearState
 4- launchApp
 5
 6- tapOn: "Add Goal"
 7
 8# Now on the add-goal screen
 9
10- tapOn: "Goal name"
11- inputText: "Exercise"
12
13- tapOn: "Goal hours per week"
14- inputText: "3"
15
16- tapOn: "Create Goal"
17
18# Back on the goal-list screen
19
20- assertVisible: "Exercise"
21- assertVisible: "0% (0m complete, 3h remaining)"
Running Maestro tests
To run a Maestro test:
- Start an Android emulator
- Run
maestro test <flow-yml-file-name>with the Maestro CLI
The below command will run the Maestro flow file create_goal_flow.yml:
1maestro test create_goal_flow.yml
Maestro will automatically detect the running emulator and run the test on it:
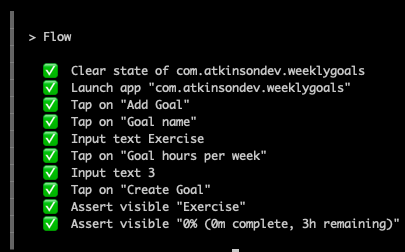
Currently the maestro test CLI command only supports running one flow YAML file at a time.
I don't know about you, but I'm too lazy to run all my individual test files by hand and would forget to add
tests if I had a list of them to maintain.
Can you use Gradle to run all your Maestro tests in a single Gradle command?
Gradle task
Yes! Using Gradle, you can write a small task that will detect all the files in your flows and run maestro test for each
of the flows.
This will execute all of your Maestro tests without you needing to run them each by hand.
build.gradle
 1task maestroTest {
 2    String maestroFlowsDir = "src/maestro/flows"
 3
 4    doLast {
 5        file(maestroFlowsDir).eachFile { flowFile ->
 6            exec {
 7                commandLine "maestro", "test", "$maestroFlowsDir/${flowFile.name}"
 8            }
 9        }
10    }
11}
Now you can run ./gradlew maestroTest to run all your Maestro test flows.
And now that you have a Gradle task for running your Maestro tests, you can integrate your Maestro tests in your existing Gradle build lifecycle.
For example, to run your Maestro tests as part of the check task and ensure your tests aren't run until the
updated app is built, you can add this to your build.gradle file:
1maestroTest.dependsOn('installDebugAndroidTest')
2check.dependsOn('maestroTest')
Screenshot on failure
The more information you have about a test failure, the faster it is to diagnose what went wrong. In the browser testing world, it's common to take screenshots when a test fails when using a tool like Cypress. Maestro doesn't yet have that type of capability, but you can construct with Gradle.
Let's update your Gradle task to catch an exception thrown by your test execution and run a small Maestro script that will take a screenshot of the current state of the screen:
build.gradle
 1task maestroTest {
 2    String maestroFlowsDir = "src/maestro/flows"
 3
 4    doLast {
 5        try {
 6            file(maestroFlowsDir).eachFile { flowFile ->
 7                exec {
 8                    commandLine "maestro", "test", "$maestroFlowsDir/${flowFile.name}"
 9                }
10            }
11        } catch (Exception e) {
12            // Take a screenshot if one of the tests fails
13            exec {
14                commandLine "maestro", "test", "src/maestro/screenshot.yml"
15            }
16
17            throw e
18        }
19    }
20}
And then the screenshot.yml file:
1appId: com.atkinsondev.weeklygoals
2---
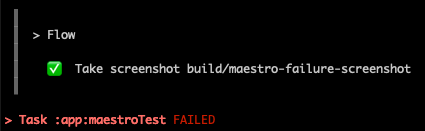
3- takeScreenshot: build/maestro-failure-screenshot
Now when a test fails, the task will take a screenshot of the current of the app screen and place it in the file build/maestro-failure-screenshot.png
Gradle plugin (new)
I started with the Gradle task above, but with Gradle what's better than copying a task definition between projects? A Gradle plugin!
I created a small Maestro Gradle plugin that encapsulates the above functionality to run Maestro tests using the Maestro CLI and optionally take a screenshot if a test fails.
To use it, first add the plugin to your build.gradle file's plugins block:
1plugins {
2  id 'com.atkinsondev.maestro' version "1.1.1"
3}
Version 1.1.1 was the current version at the time of this writing - please see the Gradle plugin portal for the latest version.
Next, add a task to your build file such as the following - replacing "src/maestro/flows" with the directory containing your flow files:
1task maestroTest(type: com.atkinsondev.maestro.MaestroTest) {
2    flowsDir = file("src/maestro/flows")
3}
Then you can run all your Maestro tests with a single Gradle command:
1./gradlew maestroTest
Similar to the custom Gradle task above, you can integrate the task from the plugin into the rest of your Gradle build:
1maestroTest.dependsOn('installDebugAndroidTest')
2check.dependsOn('maestroTest')
And if you're interested in the same functionality we had in the custom task to screenshot when a test fails, the plugin supports that as well.
Add the screenshotFlowFile parameter to the task - pointed at the location of your screenshot.yml file:
1task maestroTest(type: com.atkinsondev.maestro.MaestroTest) {
2    flowsDir = file("src/maestro/flows")
3
4    screenshotFlowFile = file("src/maestro/screenshot.yml")
5}
Full code and docs for the Gradle plugin are available at: https://github.com/craigatk/maestro-gradle-plugin
Which tests to write?
If you add Maestro tests into your app's test suite, you may wonder - what should you test with Maestro? How many Maestro tests should you write vs other types of tests?
Maestro tests are great to verify the app works from your users' perspective, but the tests are largely happy-path tests and aren't the speediest tests.
My vote on test types is to write Maestro tests to cover key high-level flows in your app, but keep the majority of your tests as connected tests. Connected tests give your more control over the interactions so you can simulate happy paths as well as error scenarios. Plus connected tests can cover components in isolation so they can set their data up more quickly than Maestro tests.

Despite their tradeoffs, Maestro tests are still a great way to write high-level tests to give your app the safety net that components work well together.
Conclusion
Maestro tests help fill a gap amongst tests that focus on parts of your app in isolation. These tests can be a great addition to your Android testing suite to help ensure the different components of your app work together for your users.
Happy testing!